
There can be many reasons of losing data from your iPhone, including your iPhone is stolen or damaged; data loses after iOS upgrade; all data in iPhone is removed during repairing; unintentionally remove data files from iPhone; or the factory resetting. none of your friend or expert will find out such attack and they are unbaled to stop it, but such incidents take place. Therefore, do bear in mind to make regular backups for your important data.
If you regularly backup your data, you will be able to restore your iPhone from backup files quickly, same as you restore your data from iCloud or iTunes.
Here are some steps to restore your data from iCloud:
Part 1: Restore iPhone files from The Previous Backup Files
This part is a little difficult to restore data. You can’t restore just one portion of data from iCloud backup options, but you can make it possible with Dr.fone software as it will provide you the option in its iPhone Data Recovery can help you do restore your data. It permits you to review and restore your backup data files precisely.
Now let us examine how to restore iCloud backup with Dr.fone:
Step No 1. Scan iCloud or iTunes backup
Recover Backup File from iTunes: When you select the option of backup with iCloud or iTunes, you will see instantly all the backup data files. Here you should select the files that you want to restore, and start working on “Start Scan” option.
Recover Backup File from iCloud: In this step, select the option of recover backup from iCloud, but here you will have to first create an iCloud account. Then you will be able to download and extract any backup iCloud storage full files and data in your iCloud account.
Step 2. Restore iPhone backup from iTunes/iCloud
In this step you will find displayed all data files in the backup, and you can review look them one by one. After reviewing, examine those files you want back and save them in your iPhone.
Part 2: How to Restore iPhone from Backup in iTunes
Step 1: In this step run iTunes and connect your iPhone
First you need to connect your iPhone to your personal computer or laptop and run iTunes. When it finds your iPhone, select name of your iPhone under the selection menu of iPhone.
Step no 2: in this step select a backup option and restore it to your iPhone
For the recovery of your files your iPhone from an old backup, you need to select the option of “Restore from Backup…“. now select a backup data file on the pop-up screen and now are able to restore it to your iPhone.
Part 3: Restore iPhone from Backup via iCloud (Entire Recovery)
If you want to restore your entire data with iCloud or just as fixing iPhone from iTunes backup, The Apple company does not allow you to review the content of iCloud backup data files. You can either restore it entirely or cannot do anything.
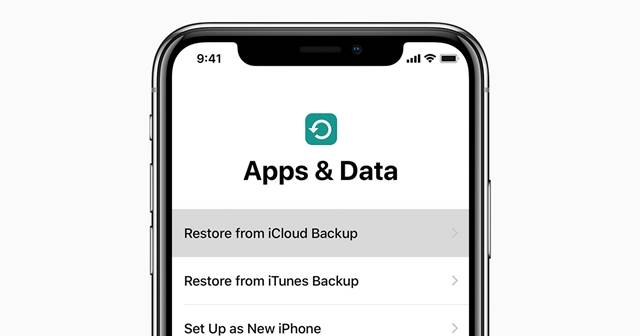
So when you want to fix this issue, you should set your iPhone as a new one, in this way you can restore your backup from iCloud. Here are the steps for your to restore whole data from iCloud below.
Go to Settings option then General and now tap on Reset and now Remove All Setting and Contents.
When you have completed the removal of all contents and settings on your iPhone, your iPhone smartphone will automatically reboot and you now you are able to set it now. When you checked all the data showing at the right.

Select “Restore from iCloud Backup” option. Now you are able to select the backup of your data and restore it to your iPhone.
Part 4: Recover Data from iCloud Backup
Easy steps
Step 1. In this step you should choose recovery mode
You will see data recovery options in this step. Now choose “Recover from iCloud Files” option and you’ll see the window below. Get into your iCloud account and use your security password to sign in. Don’t worry about your pricey as Dr.fone keeps and protect your privacy seriously and it never keeps a listing of any Apple content or account data whenever you want.
Step 2. Download iCloud Backup File
After opening your iCloud, the iPhone will be able to find all iCloud backup files in your iCloud account. Now opt for one where you are going to restore your data files and then select the option of “Download”.
You will see in the pop-up your all data files, now you can select the data files that you want to download. You can decrease your downloading time during iCloud backup file downloading. After that, you are able to scan the iCloud data files. Simply click the “Next” option for start of installation. It will take short time. Be patient and wait for time.
Step 3. Recover Data from iCloud Backup File
In this step after the completion of the process of scanning in a couple of minutes, you can now review your all data in your iCloud backup, such as contacts, images, messages, apps and more. Check them one by one and mark the product you want to back up in your iPhone or iCloud account. Now select “Recover to your iPhone” or “Recover to Computer” option to save them on your personal computer or your iPhone with a single click.
Now you can recover your messages, contacts, and notes directly to your iOS iPhone, if your iPhone is connected with your personal computer with a USB cable.
Tips: Restore data from downloadable iCloud backup files directly:
If you have downloadable backup data files, you do not need to sign in and get off the iCloud backup file again. You need to just click “To preview and scan formerly downloadable iCloud backup file”.
Also Read:
Best iPhone Foosball racing games
Then you are able to see all your downloadable iCloud backup files in your record. You can select them to extract. You can find all these backup files on your own laptop or computer. If you do not need these files any more, you can scan to remove them absolutely in junk files options.
This post was last modified on September 24, 2018 4:04 PM