• Skip to primary navigation
  • Skip to main content
  • Skip to primary sidebar
  • PR & Contacts
  • Privacy Policy
  • About
  • Products

Technos Amigos

Mobile Phone News, Reviews & Tech How to Guide

  • Android
  • Apple
  • How to
  • Latest Tech News
  • Nokia
  • Phones
Home » iPad Air

iPad Air

How to Download Hyperlapse for iPhone, & Apple iPad

Hyperlapse by Instagram has just arrived and guide here to download Hyperlapse IPA for iPhone, iPad, iOS devices.

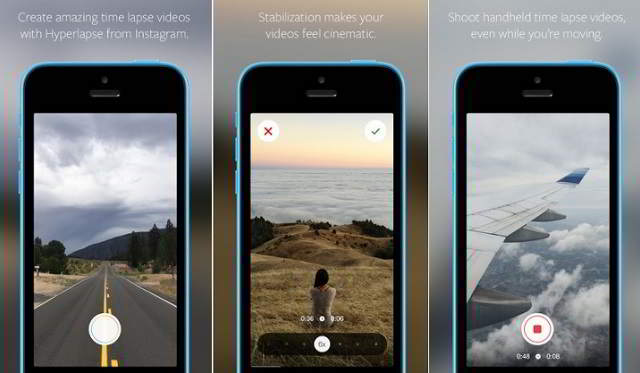
Instagram for the iPhone users has come up with a new Hyperlapse app which allows users to record new high-quality time-lapse video with video stabilization. If recording video while on the move, definitely there will be shaking will show up in the video. With Hyperlapse inbuilt stabilization technology, you can have time lapses video without any shake.

download Hyperlapse for iPhone

The Hyperlapse is developed by Instagram and it doesn’t even require you to have an Instagram account. Simply download the app from iTunes store and enjoy. But the happiness just ends there as it’s only limited to people who own iOS devices like iPhone X, iPhone 8, iPhone 7, iPhone 6S, iPhone 6, iPhone 6 Plus, iPhone 6S Plus, iPhone 5, 5S, 5C, iPhone 4 and upper version, iPod Touch, iPad, iPad Mini, iPad Air.

Just like Instagram, once the video has recorded on Hyperlapse app, you can add filters and effects for better video.

Hyperlapse Features

  • Shoot time lapse videos in motion
  • Includes automatic stabilization for cinematic quality videos
  • Share recorded Hyperlapse videos on Instagram, Facebook or save it on your device
  • Doesn’t required Instagram account
  • Video playback speed between 1x-12x

Download Hyperlapse iPA

For those people who are having trouble installing the Hyperlapse on iOS devices (for reasons it’s not available in your country or device problem), you can go ahead and install Hyperlapse IPA file which is known to be a second way to install apps on iOS devices.

Download Instagram for iPhone and iPad

How to Turn Off Auto Correction on iPhone, iPad

Here is the guide on how to turn off Auto-correction on iPhone and iPad.

Auto correct is a feature which corrects the incorrect text typed by the user. But it becomes a bit irritating when it gives you word which is unfavorable. It is designed to give user better experience of texting, while it may be problematic for others. These users can make their texting easy by turning this feature off.

Explained underneath is the procedure to turn off the auto correct feature on your iPhone and iPad.

Turn Off Auto Correction on iPhone

Some of the steps to turn on or off autocorrect on your phone. These steps can also be used to turn off iPad Auto correction suggestion. Follow then below –

  • Go to the Settings.Apple General Settings
  • Select General.
  • Scroll down until keyboard is found.iPhone Auto Correction
  • Now you will find Auto Correction on, to turn it off just grab and slide towards left, and for switching on follow the above-given procedure and slide towards right.

Several tweaks to use auto correct

When you type something, auto correct learns that word, and in future whenever you type similar word it suggests you by predicting that word. But many a times it learns some wrong words too, therefore you need to store in auto correct the word you will type.

You can do this by going to settings followed by selecting general, keywords, shortcuts, by doing this you can store the frequently used word and edit the incorrect one. By doing this it will show you the correct word which you want to type.

Also Read – iPhone 6C Details

There is another way to prevent the incorrect suggestions by auto correct. For this you need to erase all the words that auto correct has learned, by going to settings then selecting general followed by reset, then select reset keyboard dictionary. Now auto correct will be reset and start learning from beginning.

Download iPhone Data Recovery Software for Mac, Windows – PhoneRescue

You thought you would never be so careless as to delete gigabytes of files from your iPhone but you just did! Oh, you have cleaned up the call log and text messages too! Do not worry, now that you know it could happen to just anybody, be thankful that you can use PhoneRescue an iPhone data recovery software to retrieve all your valuable information stored in your phone. PhoneRescue is an application for data recovery on iOS devices. It works on Windows and Mac.iPhone Data Recovery

You can use this software to recover data as many times you want. This app is totally indispensable for the careless and even comes in handy for the careful people because nobody has control over accidents that are determined to happen.Phone Rescue software You may want to try other data recovery applications but here is why PhoneRescue is the best:

  • It is the only software that can recover 22 different types of media files on any iOS device. You will also get back all lost messages, image, video and audio files.
  • PhoneRescue also helps recover call history, iTunes backup files and photos from a damaged iOS device.
  • You can directly copy-paste all contents of the recovered data to the clipboard while exporting. This saves a lot of hard work and time. Convenience is the key element of the PhoneRescue software application.
  • The user-friendly user interface and step-by-step guide helps even a layman to recover all files with the most complicated procedures. With the screen-by-screen status display and button-by-button instructions, you would not need to ask anybody else to help you out.

Devices that support the PhoneRescue app are:

  • iPhone 3G and iPhone 3GS, iPhone 4 and iPhone 4S, iPhone 5, iPhone 5S and iPhone 5C
  • iPad, iPad 2, new iPad, iPad 4, iPad Air, iPad Mini
  • iPod touch and iPod touch 2, 3, 4 and 5

Basically all the current iOS devices support this app. The tool has returned gigabytes of apparently unretrievable data to their users. With this app handy, you do not have to worry about being the careless one with your phone or have a curious little baby around.

IOTransfer 2 an Ultimate iPhone/iPad Manager Review

Personally speaking, managing on your iPhone using the iTunes software isn’t the perfect experience for me. You need to authenticate your profile, and with every update, the iTunes app seems to be more disk space hungry. Moreover, it doesn’t have an ideal media player.

There are reports of authorization feature which can be limiting for few users who uses multiple iDevices. This is where your search for the best iPhone Managing app begins and There exists SynciOS, iMazing, iPhone Explorer, AnyTrans, MobiMover and lot many others but on our assessment, we found that IOTransfer 2 (latest version) is a step ahead in the competition.

IOTransfer iPhone manager tool

In this article, we go through IOTransfer 2 review, some features that are handy and overview why it’s recommended to use.

IOTransfer 2 Review

IOTransfer 2 is a complete iPhone manager tool which can work as iOS file transfer and full iPhone management tool with straightforward workflow. It enables users to completely manage your iPhone which includes tasks like file transfer, adding/removing photos, music, videos, contacts, ebooks, and podcasts.

I am not going through the installation process because that’s pretty simple and straight-forward. Download the software, click on the .exe file to install and you are ready to use within no time.

Comparing from the previous version i.e., the first ever IOTransfer, the new version 2 includes a Clean tool will scan the iOS device and help free up more space. In order to clean unwanted files, you need to open the tool and click on Clean. We have tested this tool and it works completely fine.

Cleaning unwanted files on iPhone, iPad

This feature is awesome for those iPhone and iPad users who have limited storage on your device. Remember that there are still iPhone users with 16 GB total storage and handling all stuff on it is very hard. You don’t even have space to download a cleaning app if you need.

You can even download online videos from hundreds of online sites like YouTube, MetaCafe, Facebook, Vimeo, Vine, Instagram and directly saving them to your iPhone and iPad.

Downloading the videos to your iPhone/iPad is pretty easy. Just head to Video Tab and then select then add the Video URL and set the download location in the ‘Save To‘.

Video download to iPhone

We are quite surprised to see that our video was directly downloaded to my iPhone 8. Well, this is awesome!

You can even back up iOS data to a computer, copy files from local directories to your iDevice and that’s like fully managing your iPhone or iPad.

Talking about the installation, it takes not more than a minute of your time, super-easy and flawless with no bloatware whatsoever.

Features

  • Support transferring photos, videos, music, iBooks, contacts, podcast and voice memos between iOS devices and PCs.
  • Support managing iOS contents. Add and remove them easily.
  • One-click to back up files like photos, videos, songs and contacts.
  • Even manage your iPhone contacts easily.
  • Online Video Downloader supports downloading videos from several sites.
  • iOS Cleaner will remove junk files and free up more storage space on your iPhone and iPad.
  • It automatically downloads the required iPhone drivers required to connect your device to PC/laptop.
  • Software updates automatically when there are new updates available.

Latest Features in IOTransfer v2.1

  • Supported adding and editing contacts
  • Supported iOS 11’s HEIC image format
  • Newly supported converting iOS device’s HEIC image format to JPG

Compatibility

  • Works on Windows 7/8/8.1 and Windows 10
  • Supports iPhone, iPad, iPod Touch with iOS 8.3 or later

Conclusion

So, that’s how the IOTransfer 2 an iPhone transfer software that works like charm in managing your existing iDevice. You can download it from the official site for free and there exists PRO version too. It costs $24.99 with the current sale.

How to Share Apple Maps location on iPhone, iPad

Here we are going to tell you how to share Apple Maps location on iPhone, iPad. You may imagine yourself to be a master in providing directions. We want to make you realize that you are entertaining a misconception in your mind, but this is not your fault.

The main criteria is that even if you are acquainted the route to a special destination that is dear to heart. In this condition, you may not have idea about what is going in the head of the recipient person who is on the other side.

You cannot create or give a guarantee that whatever instructions you are giving to the other recipient person concerning addresses and streets will be well understood by him. However if you know about the directions that can make the task easier then this could be the greatest happiness.

Share Apple Maps location on iPhone

A map on your Apple iPhone could make it happen and you will find it inside the pocket of your trousers. Today all smartphones are preloaded with specific kinds of digital maps. If you look at a close look at android phones then you will find that these devices have trust on Google maps. The Windows smartphone is having Bing Maps on the other hand iPhones have Apple Maps. They are grouped with the GPS handset and help in seeking your pathway during a journey.

If you are required to tell your friends and dear ones what is your location that they do not know about due to new local landmarks, then you don’t have to take the help of a third party.

We are telling an easy method to share your current location by using the in-built maps in your Apple iPhone:-

  1. Activate and open up the Map application in your Apple iPhone.
  2. Choose the blue colored icon that is seen in the left corner at the bottom. This will help in pin pointing your current destination within the Apple iPhone Maps.
  3. Do tapping of the red colored pushpin to add more details about your current location.
  4. Do tapping on the “share” option in the upper hand of the right corner.

This guide works on:

  • Apple iPhone X
  • iPhone 8
  • iPhone 8 Plus
  • iPhone 7
  • iPhone 7 Plus
  • iPhone 6S
  • iPhone 6
  • iPhone 6S Plus
  • All other iPhone, iPad and iPod models.

It will also work on upcoming iPhone 9, iPhone 10 and iPhone 11 as well.

So, that was an easy guide on how to Share Location on Apple Maps on iPhone, iPad and iPod.

  • Page 1
  • Page 2
  • Go to Next Page »

Primary Sidebar

Something Interesting For You

3 Tips for Managing Transformer Repairs Remotely

AT&T RollOver Data Rules, Limits & other FAQs

How to Send Large Size Videos on WhatsApp

The 7 Best Phone Tracker Apps of 2025 | Full Review


Copyright © Technos Amigos | Part of Yogesh Khetani blogging network